

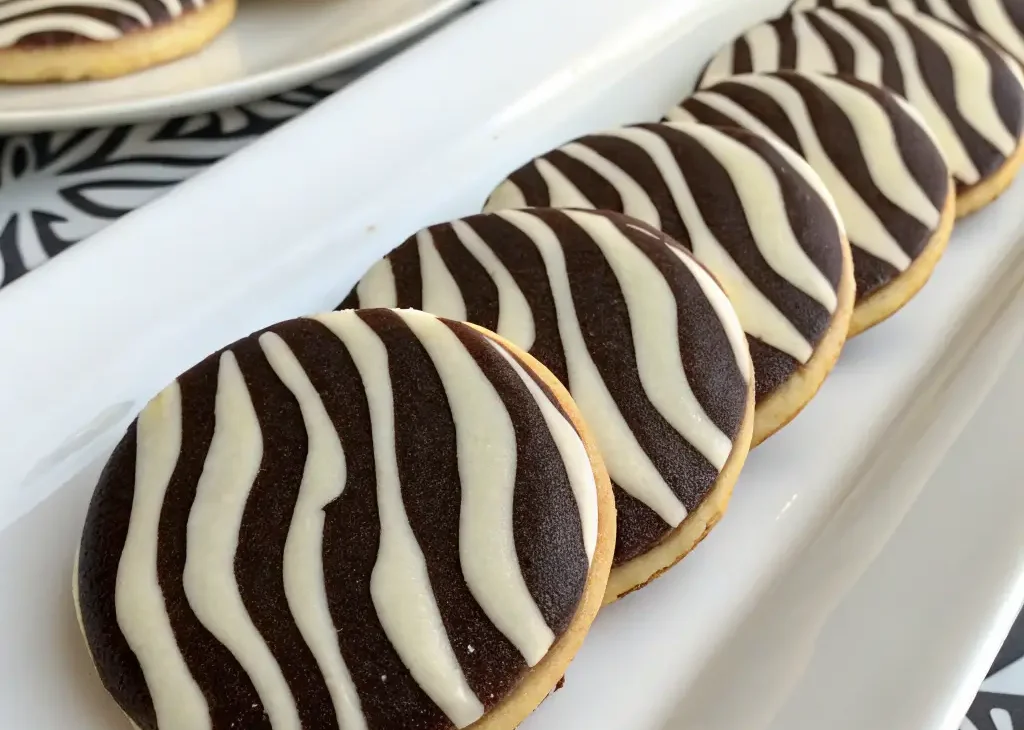
Zebra Cookies: A Strikingly Beautiful Treat with Perfect Texture
The Ultimate Eye-Catching Cookie Experience
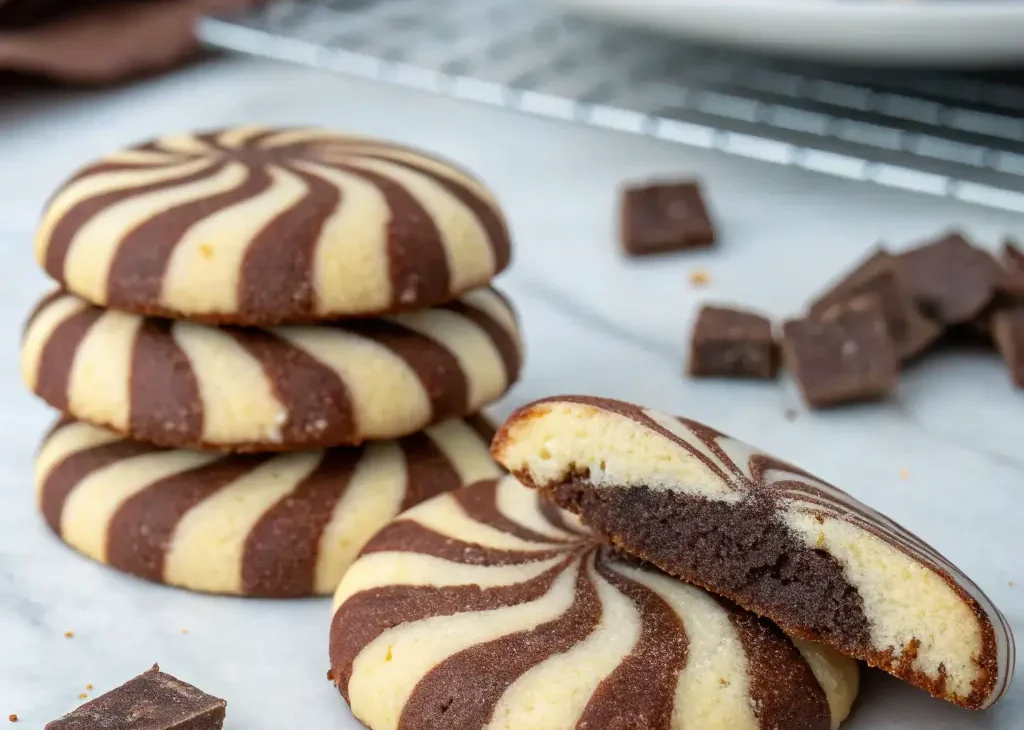
Prepare to dazzle your guests with these mesmerizing Zebra Cookies – a stunning combination of vanilla and chocolate doughs swirled together to create dramatic striped patterns. Unlike ordinary cookies, these beauties offer both visual drama and perfect texture contrast: crisp edges with a slightly chewy center. Whether you’re hosting a sophisticated tea party or just want to elevate your everyday baking, these cookies deliver professional patisserie results from your home kitchen.
Why These Zebra Cookies Outshine the Competition
After extensive recipe testing, this version stands apart because:
- Precision Swirling Technique – Creates picture-perfect zebra stripes every time
- Dual-Texture Perfection – Crisp exterior with tender, slightly chewy interior
- Flavor Balance – Rich chocolate complements but doesn’t overwhelm the vanilla
- Dough Science – Special chilling method prevents colors from bleeding
- Versatile Presentation – Equally stunning as large cookies or delicate tea-sized bites
- Make-Ahead Friendly – Dough stores beautifully for fresh-baked cookies anytime
- Clean Ingredient List – No artificial colors or flavors
Curated Ingredients for Flawless Results
Vanilla Dough Components
- European-style butter (1 cup) – 82% fat content, softened properly
- Granulated sugar (¾ cup) – For structure and sweetness
- Light brown sugar (¼ cup) – Adds moisture and depth
- Egg (1 large) – Room temperature, beaten lightly
- Pure vanilla extract (2 tsp) – High-quality Madagascar bourbon preferred
- All-purpose flour (2¼ cups) – Spooned and leveled for accuracy
- Cornstarch (1 tbsp) – Secret for tender texture
- Baking soda (½ tsp) – Fresh for proper rise
- Fine sea salt (½ tsp) – Balances sweetness
Chocolate Dough Components
- Dutch-process cocoa (⅓ cup) – Rich color and flavor
- Bittersweet chocolate (2 oz) – Melted and cooled slightly
- Espresso powder (½ tsp) – Enhances chocolate notes (optional)
- Additional flour (2 tbsp) – Compensates for cocoa absorption
Master Technique: Creating the Signature Swirl
Phase 1: Dough Preparation
- Cream butter and sugars – 5 minutes until pale and fluffy
- Add egg and vanilla – Mix until fully incorporated
- Whisk dry ingredients – Flour, cornstarch, baking soda, salt
- Divide dough – 60% for vanilla, 40% for chocolate
- Create chocolate portion:
- Melt chocolate and cool to 90°F (32°C)
- Mix into smaller portion with cocoa and espresso powder
- Adjust with extra flour as needed
Phase 2: Swirling Method
- Chill doughs – 30 minutes for easier handling
- Roll vanilla dough – Between parchment to ¼” thickness
- Add chocolate layer:
- Roll chocolate dough to same size
- Place atop vanilla layer
- Create spiral:
- Starting from long edge, roll tightly into log
- Wrap in parchment and twist ends
- Final chill – 2 hours minimum (up to 3 days)
Phase 3: Baking Perfection
- Slice cookies – ¼” thick with sharp knife
- Arrange on sheets – Space 2 inches apart on parchment-lined baking sheets.
- Bake at 375°F (190°C) – 10-12 minutes until edges set
- Cool completely – On wire rack for crisp texture
Professional Tips for Flawless Execution
Swirl Perfection Secrets
- Temperature control – Dough should be cool but not rock hard
- Even pressure – Maintain consistent rolling thickness
- Clean cuts – Wipe knife between slices
- Rotation trick – Quarter-turn after each slice for varied patterns
Baking Science
- Oven thermometer – Ensure accurate temperature
- Single pan baking – Prevents uneven heating
- Doneness test – Centers should look slightly underbaked
- Cooling method – Transfer to rack after 2 minutes
Innovative Variations to Explore
Flavor Twists
- Orange zest – Add to vanilla dough
- Mint chocolate – Peppermint extract in chocolate portion
- Spiced version – Cinnamon and cardamom in vanilla dough
- Mocha swirl – Increase espresso powder
Visual Presentations
- Pinwheel style – Slice log diagonally
- Checkerboard – Alternate stacked dough cubes
- Marble effect – Gentle kneading of portions
- Dipped ends – Partially coat in tempered chocolate
Troubleshooting Common Issues
Problem: Colors bleeding together
Solution: Chill dough longer and work in cooler kitchen
Problem: Swirls too tight/loose
Solution: Adjust rolling tension and dough thickness
Problem: Cookies spreading too much
Solution: Ensure proper flour measurement and chilling
Problem: Uneven baking
Solution: Rotate pan halfway and use light-colored sheets
Presentation & Serving Suggestions
Showstopping Displays
- Stacked tower – Alternating direction of stripes
- Glass jar gift – Layered with parchment between
- Dessert charcuterie – With other complementary cookies
- Cookie bouquet – Arranged in flower pot with paper “leaves”
Perfect Pairings
- Espresso – Complements chocolate notes
- Vanilla bean ice cream – For cookie sandwiches
- Dessert wines – Try with Muscat or late harvest Riesling
- Milk flights – Whole, almond, and oat milk tastings
Storage & Gifting Guidelines
Preservation Methods
- Room temperature – 5 days in airtight container
- Freezing dough – Up to 3 months (slice before freezing)
- Freezing baked – 2 months with parchment layers
- Reviving – 5 minutes in 300°F (149°C) oven
Gifting Ideas
- Bake-and-give kit – Pre-sliced frozen dough with instructions
- Cookie mix jars – Layered dry ingredients with recipe
- Decorative tins – With custom labels
- Cookie bouquets – Arranged with ribbon-wrapped sticks
Final Professional Secrets
- Chill twice – After mixing and after forming log
- Sharp tools – Use serrated knife for cleanest cuts
- Consistent sizing – Weigh dough portions for uniformity
- Baking stones – For most even heat distribution
- Patience pays – Allow proper cooling for crispness
- Creative freedom – Each cookie will be uniquely beautiful
- Quality ingredients – Splurge on good cocoa and vanilla
- Have fun! – The imperfections make them charming
Conclusion: Edible Works of Art
These Zebra Cookies represent the perfect marriage of baking science and edible artistry. With their striking visual appeal and balanced flavors, they’re guaranteed to become your new signature cookie. Whether you’re a seasoned baker looking for a creative challenge or a beginner wanting to impress, this recipe provides all the guidance needed for success.
Ready to create your own striped masterpieces? Preheat your oven, clear your workspace, and prepare for these stunning cookies to become the talk of every gathering. The process itself becomes a meditative practice, and the results – well, they speak for themselves in every beautiful, delicious bite. Happy baking!