
Sweet Bread: Rum Baba – A Decadent and Fluffy Boozy Delight
Few desserts can match the luxurious texture and rich flavor of a perfectly made Rum Baba. This classic European sweet bread, known for its airy brioche-like crumb and intoxicating rum syrup, has been delighting pastry lovers for centuries. Originating in France and popularized across Italy and Eastern Europe, this dessert strikes the perfect balance between elegant and comforting.
In this guide, we’ll take you through everything you need to know to master this dessert at home. You’ll discover:
A foolproof step-by-step recipe with detailed instructions
Expert tips for achieving the perfect texture
Variations to customize your Rum Baba
Serving and storage advice
The history and cultural significance of this beloved dessert
Whether you’re a baking novice or an experienced home chef, this guide will equip you with all the knowledge needed to create an unforgettable Rum Baba.

The Fascinating History of Rum Baba
Before we dive into the recipe, let’s explore the origins of this iconic dessert. The Rum Baba (or “Baba au Rhum”) traces its roots to 18th century France when King Stanislaus of Poland, living in exile in Lorraine, found his traditional Polish yeast cake too dry. His pastry chef had the brilliant idea to soak it in Malaga wine, creating the first iteration of this dessert.
Later, when the recipe reached Paris, chefs substituted the wine with rum, which was more readily available in France. The dessert quickly became a staple in French patisseries and spread across Europe. Today, it’s particularly beloved in Naples, where it’s often served with whipped cream and fresh fruit.
Understanding this rich history adds an extra layer of appreciation when baking (and eating!) this timeless treat.
Why You Should Make Rum Baba at Home
While you can certainly buy Rum Baba at bakeries, homemade versions offer several advantages:
🍞 Superior freshness – Nothing beats the aroma of freshly baked baba
🍯 Customizable sweetness – Adjust the syrup to your taste
🍊 Creative freedom – Experiment with different flavors and presentations
💰 Cost-effective – Bakery-quality results at a fraction of the price
Plus, the process is more straightforward than you might think!
Essential Ingredients & Equipment
Ingredients for the Dough:
- 2 ¼ cups (280g) all-purpose flour (plus extra for dusting)
- ¼ cup (50g) granulated sugar
- 1 packet (7g/2¼ tsp) active dry yeast
- ½ cup (120ml) whole milk, warmed to 110°F
- 3 large eggs, at room temperature
- ½ tsp fine sea salt
- ½ cup (115g) unsalted butter, softened
- Zest of 1 lemon or orange (for bright citrus notes)
For the Rum Syrup:
- 1 ½ cups (300g) granulated sugar
- 1 ½ cups (360ml) water
- ¾ cup (180ml) dark rum (or adjust to taste)
- 1 vanilla bean (or 1 tsp vanilla extract)
- Optional flavorings: 1 cinnamon stick, 3-4 cloves, or orange peel
Equipment Needed:
- Stand mixer with dough hook (or strong arms for hand kneading)
- Baba molds or muffin tin (for individual portions)
- Small saucepan for syrup
- Pastry brush for syrup application
Step-by-Step Baking Guide
1. Preparing the Dough
a) Activate the yeast:
- Combine warm milk (110°F), 1 tsp sugar, and yeast in a small bowl
- Let sit for 5-10 minutes until frothy (this proves the yeast is active)
b) Make the dough base:
- In your mixer bowl, whisk together flour, remaining sugar, salt, and citrus zest
- Add the yeast mixture and eggs
- Mix on low speed until combined, then increase to medium for 3 minutes
c) Incorporate the butter:
- Add softened butter 1 tablespoon at a time, waiting until each addition is fully absorbed
- Continue kneading for 8-10 minutes until the dough is smooth, elastic, and slightly sticky
Pro Tip: The dough should pass the “windowpane test” – when stretched thin, it shouldn’t tear immediately
2. First Rise (Bulk Fermentation)
- Transfer dough to a lightly greased bowl
- Cover with plastic wrap or a damp towel
- Let rise in a warm, draft-free place for 1-2 hours until doubled in size
Ideal rising conditions:
- 75-78°F (24-26°C) is perfect
- If your kitchen is cool, place the bowl in the oven with just the light on
3. Shaping and Second Rise
- Punch down the risen dough to release air bubbles
- For individual babas:
- Divide into 12 equal portions (about 50g each)
- Roll into smooth balls and place in greased molds or muffin tins
- For one large baba:
- Place all dough in a greased 9-inch Bundt pan
- Cover and let rise again for 30-45 minutes until puffy
4. Baking to Perfection
- Preheat oven to 350°F (175°C)
- Bake small babas for 18-22 minutes, large baba for 30-35 minutes
- They’re done when golden brown and sound hollow when tapped
- Cool in pans for 5 minutes, then transfer to a wire rack
5. Preparing the Rum Syrup
While the babas bake:
- Combine sugar, water, and any additional flavorings in a saucepan
- Bring to a boil, then reduce heat and simmer for 5 minutes
- Remove from heat and stir in rum and vanilla
- Let cool slightly (should be warm but not hot when soaking)
Syrup Consistency Tip: The syrup should coat the back of a spoon but still be pourable
6. The Soaking Process
This is where the magic happens:
- While babas are still warm, use a skewer to poke holes all over
- For maximum absorption:
- Option 1: Dip each baba in syrup for 10-15 seconds
- Option 2: Brush generously with syrup multiple times
- Let excess syrup drip off before serving
Professional Tips for Perfect Results
- Temperature matters:
- Cold eggs can inhibit rising – always use room temperature
- Butter should be soft but not melted
- Avoid overproofing:
- If dough collapses when poked, it’s overproofed
- In warm environments, check after 45 minutes
- Syrup absorption:
- Warmer babas absorb more syrup
- For extra moist results, soak twice with 10 minutes between
- Alcohol alternatives:
- For non-alcoholic version: Use rum extract + orange juice
- For different flavors: Try bourbon, Grand Marnier, or Kahlúa
Creative Variations to Try
1. Tropical Baba
- Add coconut rum to the syrup
- Garnish with toasted coconut and mango
2. Chocolate Rum Baba
- Mix 1 tbsp cocoa powder into the dough
- Drizzle with chocolate ganache
3. Savory-Sweet Version
- Reduce sugar in dough by half
- Soak in sweetened balsamic reduction
- Top with goat cheese and figs
4. Holiday Spiced Baba
- Add pumpkin pie spice to the dough
- Soak in spiced rum syrup
- Top with cinnamon whipped cream
Serving Suggestions & Presentation Ideas
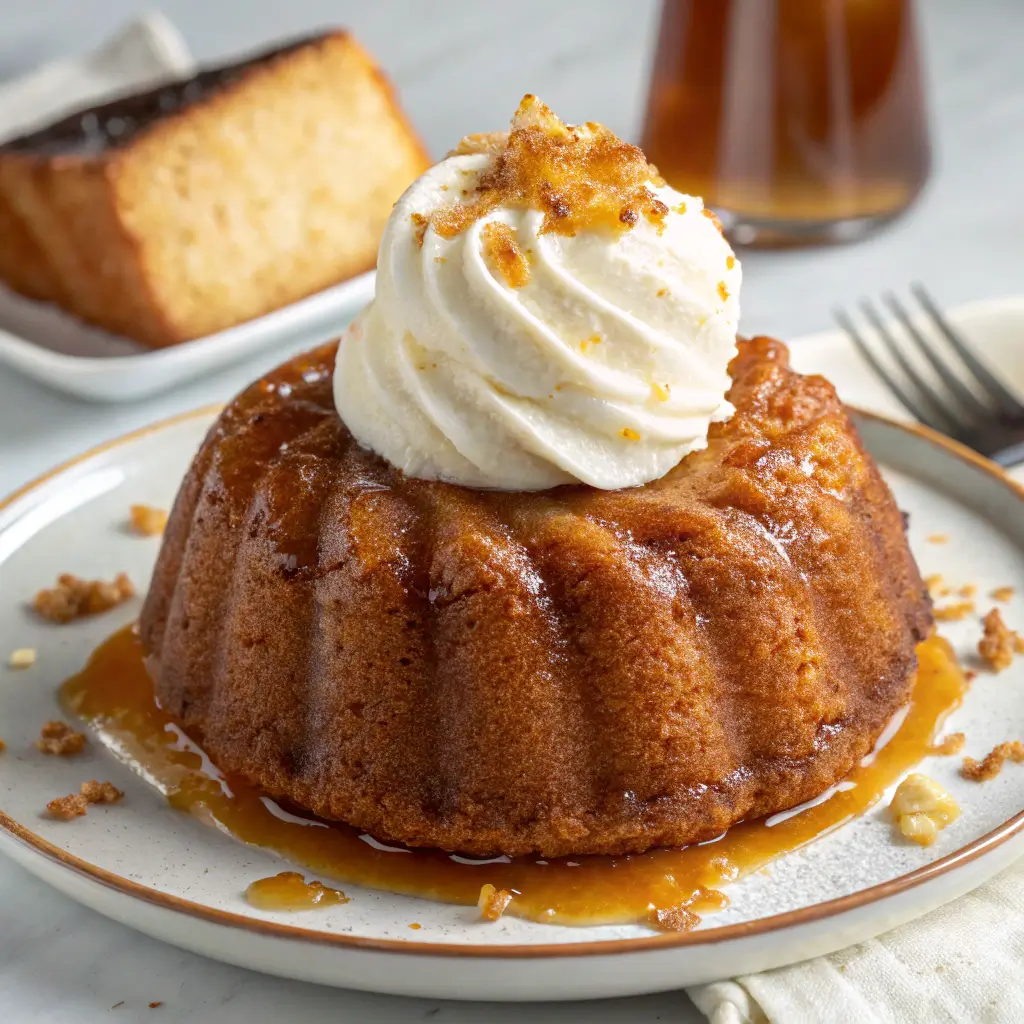
Classic Presentation:
- Dust with powdered sugar
- Pipe fresh whipped cream in the center
- Garnish with berries or edible flowers
Modern Twists:
- Serve with rum raisin ice cream
- Create a Baba trifle with layers of cream and fruit
- Make Baba French toast with day-old leftovers
Perfect Pairings:
☕ Coffee – The bitterness balances the sweetness
🍵 Earl Grey tea – Citrus notes complement the baba
🥂 Dessert wine – Try a Sauternes or Muscat
Storage & Make-Ahead Tips
Short-Term Storage:
- Room temperature: 2 days in an airtight container
- Refrigerated: 5 days (bring to room temp before serving)
Freezing Instructions:
- Freeze unsyruped babas for up to 3 months
- Thaw at room temperature
- Warm slightly, then soak in freshly made syrup
Reviving Leftovers:
- Refresh in a 300°F oven for 5 minutes
- Brush with simple syrup if dried out
Troubleshooting Common Issues
Problem: Dough didn’t rise
Solution: Yeast may be old – always check expiration dates
Problem: Baba is dense
Solution: Likely under-kneaded – ensure proper gluten development
Problem: Syrup not absorbing
Solution: Poke more holes while babas are warmer
Problem: Too sweet
Solution: Reduce syrup sugar by 1/4 cup next time

Final Thoughts
Mastering the art of Rum Baba is a rewarding baking achievement that will impress family and friends alike. With its cloud-like texture, intoxicating aroma, and elegant presentation, this dessert is perfect for special occasions or when you simply want to treat yourself.
The beauty of this recipe lies in its versatility – once you master the basic technique, you can experiment with countless flavor variations to make it your own signature dessert.
Ready to embark on your Rum Baba journey? Gather your ingredients, set aside some time for the dough to rise, and prepare to create something truly special. The heavenly aroma filling your kitchen will be reward enough, but the first bite of your homemade baba will make all the effort worthwhile.
We’d love to hear about your baking experience! Share your Rum Baba creations, variations, or questions in the comments below. Happy baking! 🎂✨